Part 1: What Is Google Account Verification and How It Works?
Before Android OS version 5.1 (Lollipop), everyone could have factory reset an Android phone and set it up from scratch without any limitation. This enabled wicked people to steal someone's phone and factory reset the phone to sell it in the market as a used phone.
To ensure that the phone is with the owner and not stolen by someone, Google introduced a security feature called Google Account Verification (also referred to as Factory Reset Protection) on Android 5.1 and above. The feature is automatically enabled when you register a Google account on your Android device and asks for previously linked Google account credentials after you perform a factory reset. If you can't provide the linked Google account credentials, it then locks you out of your device.
While Google account verification being useful to prevent unauthorized access, it can be problematic when you forget your Gmail ID and password or purchase a used phone that is locked with the previous owner's Google account. If you are left with the FRP lock, don't panic. Below we will should you how can you get around Google account verification.
Part 2:How to Bypass Google Account Verification on Android?
There are several effective ways you can use to bypass Google account verification on your Android device. You can connect your phone to your computer and use an FRP bypass tool to bypass Google account verification in simple steps. If you do not have a computer, you can still bypass Google FRP lock directly from your phone by availing some hidden features. Let's dive into it.
- Way 1. Bypass Google Account Lock on Android via FRP Bypass Tool
- Way 2. Bypass Google Account Verification on Android via TalkBack
- Way 3. Android Bypass Google Account via Google Keyboard
Way 1. Bypass Google Account Lock on Android via FRP Bypass Tool
The easiest way to bypass Google verification after factory reset is through an FRP bypass tool. We recommend 4uKey for Android as it is acclaimed as the best and easiest FRP bypass tool. It provides various FRP bypass solutions for Samsung devices with different OS versions(up to Android 12), allowing you to remove FRP lock in just a few minutes. All you need to do is to connect your locked phone to your computer, where you must have installed the FRP bypass tool, and let the FRP bypass tool do its magic.
Here are the steps on how to bypass Google account on Samsung device via 4uKey for Android.
Download and Install the Tool
Install 4uKey for Android on your computer. It is available for Windows and Mac.
Choose Unlock Mode
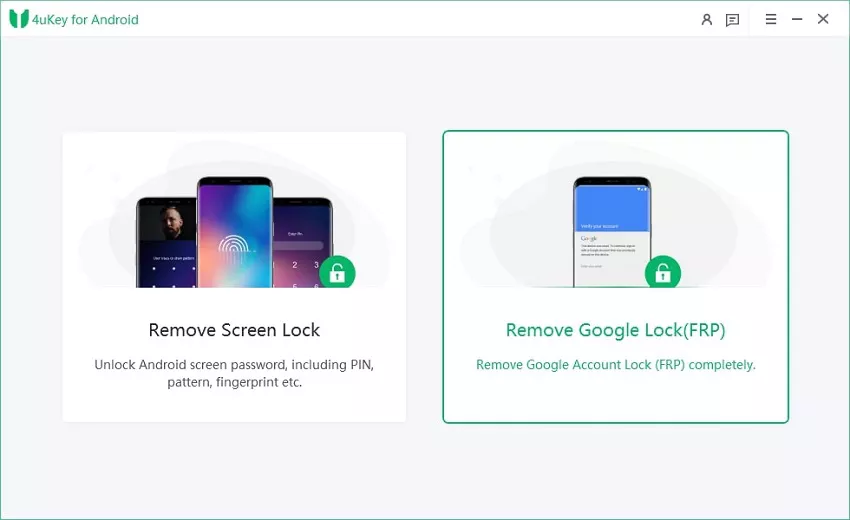
Let your Android device starts on the Welcome screen. Then connect it to your PC. Launch 4uKey for Android select the Remove Google Lock(FRP) option.
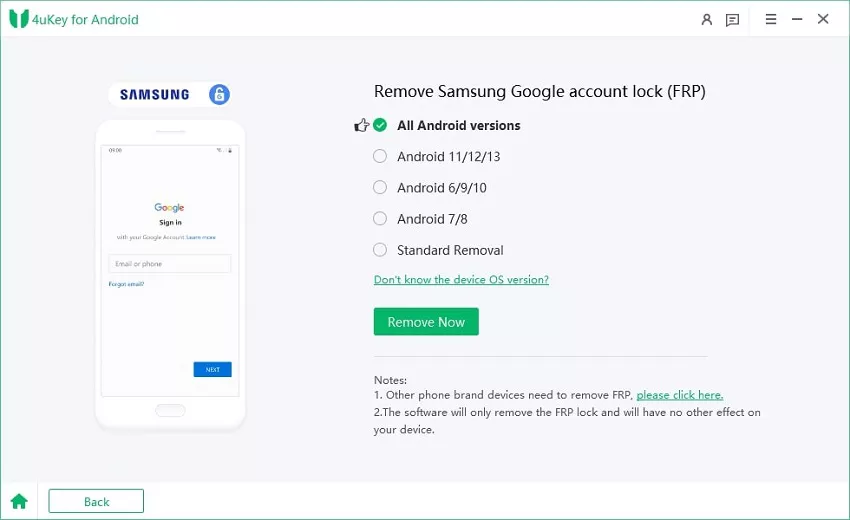
Select Android OS Version
If your phone has the latest Android version, select the Android 11/12 option. Click on the Start button. If you have a different Android version on your phone, select accordingly and follow the on-screen instructions.
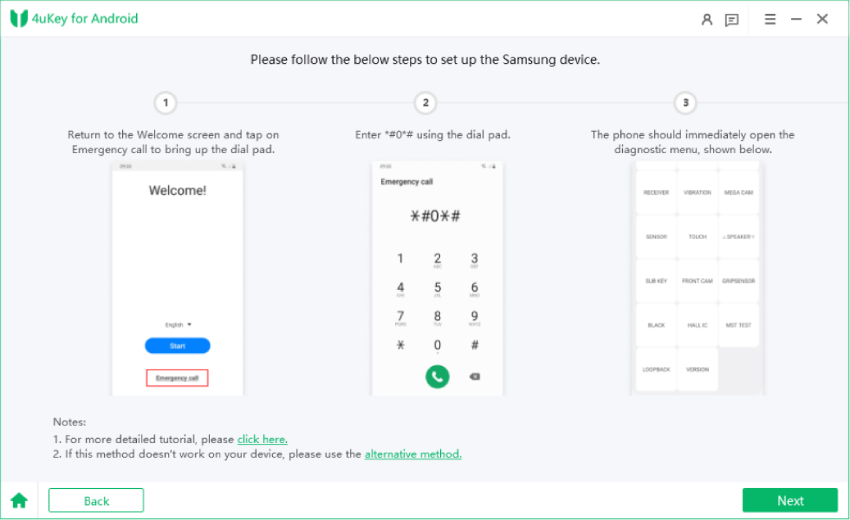
Enter Diagnostic Mode
On the next screen, you will see some instructions that you need to perform on your phone. Select the Emergency Call option. Dial *#0*# to enter into diagnostic mode. Once you have performed all the steps, click on the Next button.
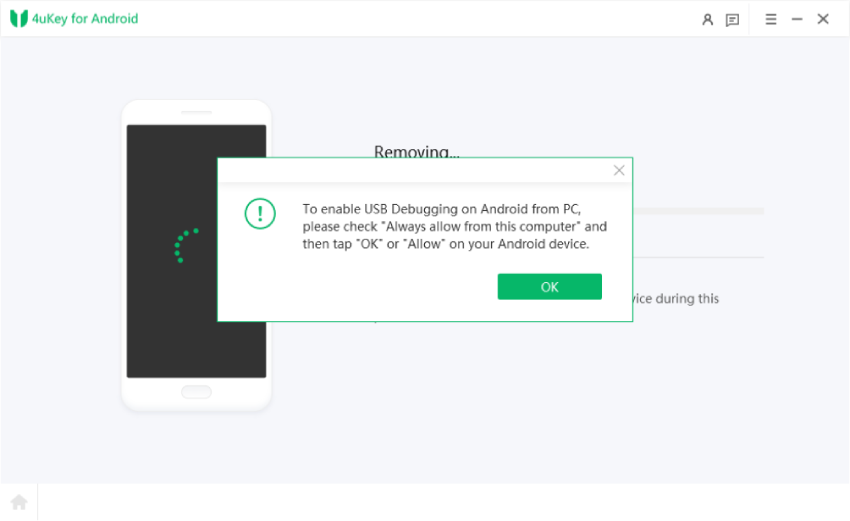
Allow USB Debugging
The tool will now remove the FRP lock. If you come across USB debugging message, follow the displayed instructions.
Unlock Samsung Pattern Successfully
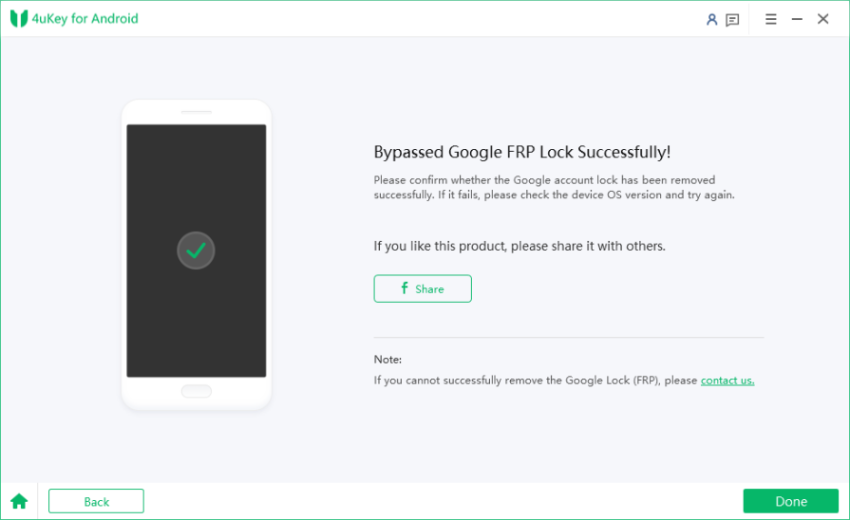
Wait a few minutes and you will see a success message. Your unlocked phone will reboot and you can disconnect it from your computer.
Video Guide on How to Bypass Google Account Verification on Android
Way 2: Bypass Google Account Verification on Android via TalkBack
If you do not have a computer, then the process to bypass Google account lock on Android is slightly lengthy and complicated. So long as your phone is running Android 11 or above, you can use TalkBack feature to bypass Google account verification on your Android phone without PC. If you have an older Android version, this method may not work, and we have mentioned an alternate way in the next section. Here are the steps to bypass Google FRP lock via TalkBack.
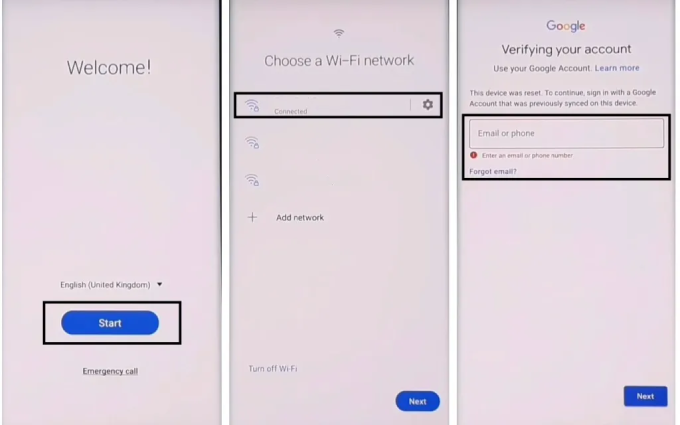
- Step 1. Force restart your locked Android phone and you will land on the Welcome page. Tap on the Start button and connect your phone to your Wi-Fi network. The next page is the Google account verification page. Go back to the Welcome screen.
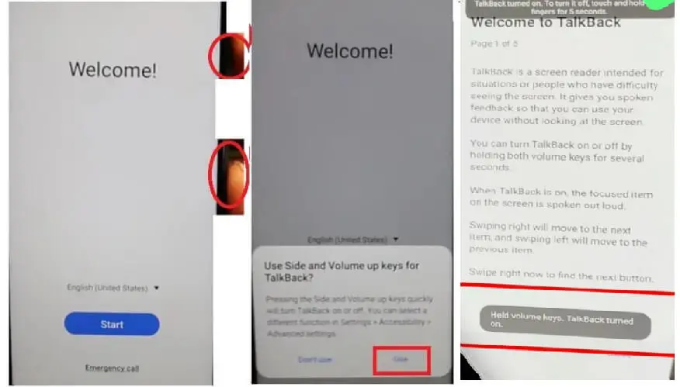
- Step 2. Press the Volume Up and the Power keys together. A pop-up will appear on the screen where you need to tap on the Use option. Press the Volume Up and Power keys together again to enable TalkBack feature.
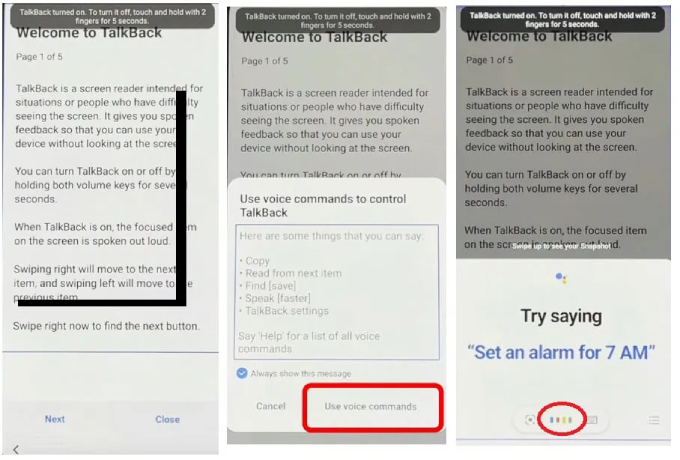
- Step 3. Draw a reverse L gesture on the screen. When the pop-up message appears on the screen, tap on the Use Voice Commands option. Thereafter, say "Open Google Assistant" and then press Volume Up and Down keys together to disable TalkBack.
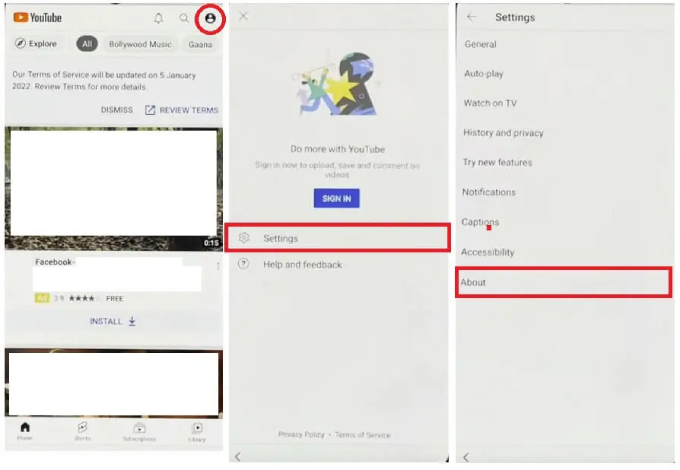
- Step 4.When YouTube opens, tap on the Profile icon and select the Settings option. From Settings, select About > YouTube Terms of Service option > Accept & Continue. When Chrome opens, tap "open Galaxy Store".
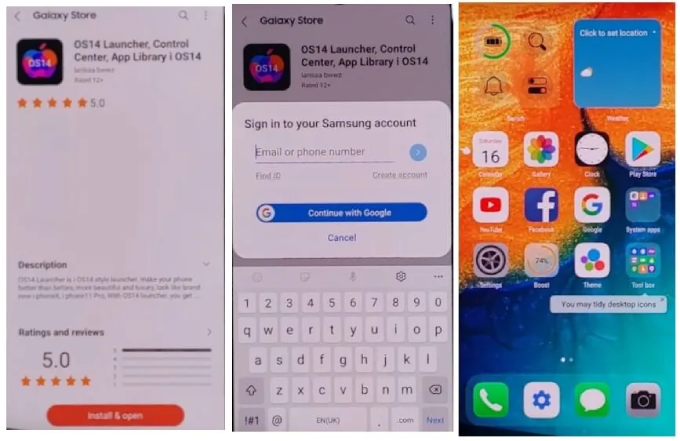
- Step 5. Once Galaxy Store opens, search for "OS14 Launcher" and tap on the "Install & open" button. You'll need to sign in to your Samsung account to download the OS14 Launcher app. After the installation, open OS14 launcher and complete the Setup.
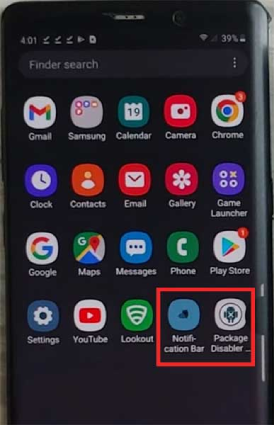
- Step 6. Now, take another Samsung device, visit https://bit.ly/2NKxXYs to download Notification Bar apk and Package Disabler Pro apk files from your Chrome browser.
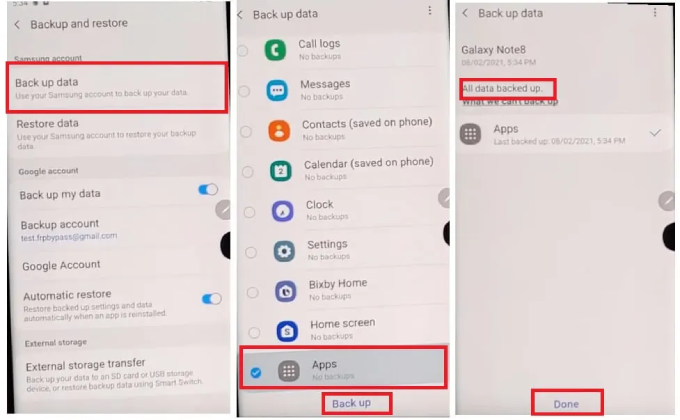
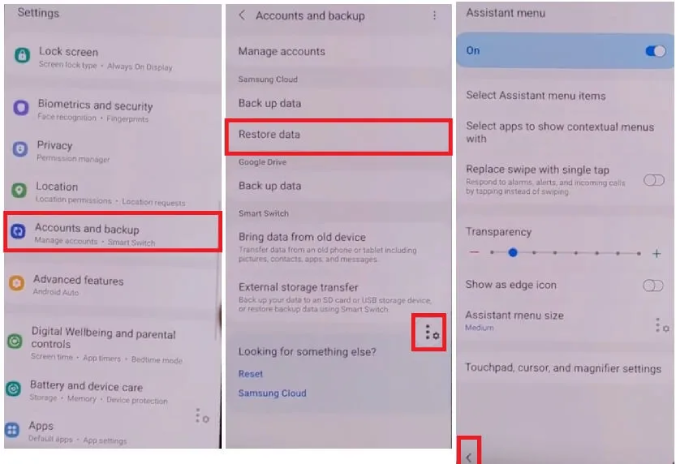
- Step 7. Once both apps are installed on this device, go to Settings > Accounts and backup > Back and restore to make a backup of your apps.
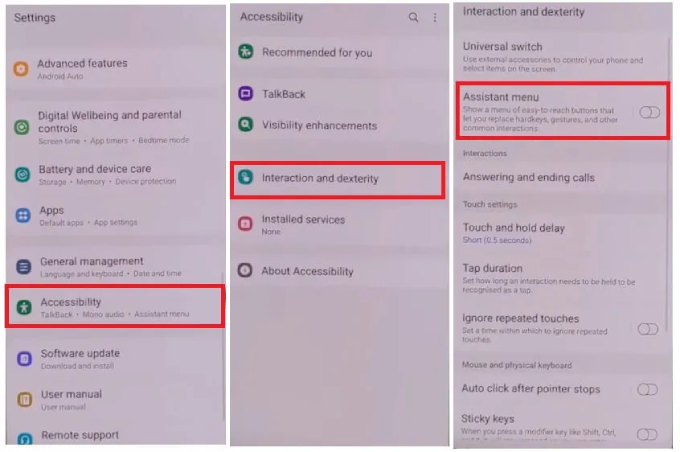
- Step 8.Go back to your device that is locked by Google FRP lock, head into Settings > Accessibility > Interaction & dexterity and toggle on the Assistant Menu option.
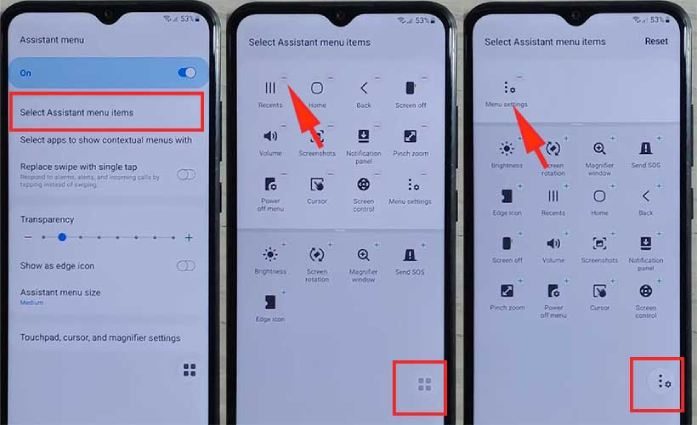
- Step 9.After that, tap on Select Assistant menu items and remove all icons except Menu Settings. Thereafter, go back to the Settings home screen.
- Step 10.Go to Settings > Accounts and backup > Restore Data. Tap on restore data and quickly tap the Assistant Menu at the bottom right corner, which can prevent the Samsung Cloud from updating. In case you see a pop-up asking you to update Samsung cloud, ignore it and try again.
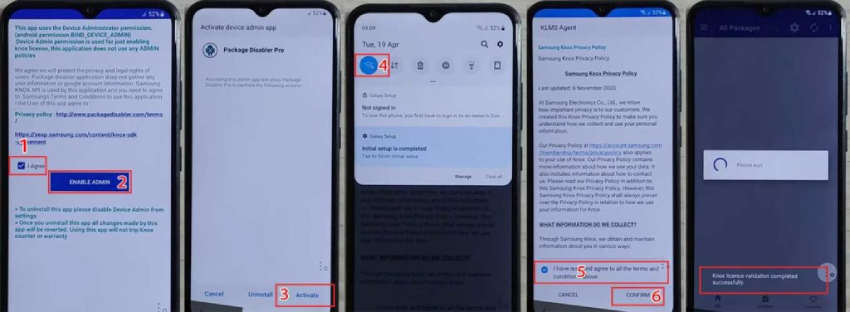
- Step 11. Once the restoration completes, go back to Menu and launch the Notification Bar. Go to Accessibility> Installed Services option. Turn on Notification Bar and tap on the Allow option. Once done, pull down the notification bar from the top to see if it is working.
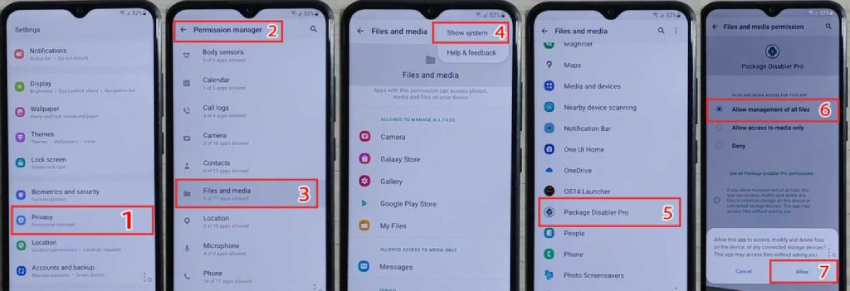
- Step 12. Next, go to Settings> Privacy> Permission Manager> Files and Media. Tap on the three-dot icon at the top-right corner and tap on Show System. Scroll down and Look for Package Disabler Pro. Tap on it, then select Allow management of all files.
- Step 13. Pull down the notification bar and turn off Wi-Fi network. Open Package Disable Pro app. Follow the on-screen instructions. Turn on Wi-Fi network and tap on Agree option.
- Step 14. Search for "setup" and select Android Setup to disable it. Tap on Samsung Setup Wizard and tap on the Clear Data button. Find a similar setup wizard for your phone if you are using any other brand.
- Step 15. You will see time appear in the top-left corner. You can now go back and set up your phone, and you won't face Google account verification screen this time.



Way 3: Android Bypass Google Account via Google Keyboard
Here is another legitimate method to bypass Google account verification without a computer. Here, we are going to use Google Keyboard instead of TalkBack option. This method is applicable to Android devices with slightly older Android versions. In fact, it is the best LG bypass Google account without computer while the TalkBack option is more applicable to Samsung devices. Here are the steps on how to bypass Google verification after factory reset via Google Keyboard.
- Step 1. After rebooting your phone, you will come across the welcome screen. Tap on the Start arrow icon. Thereafter, connect your phone to your Wi-Fi network.
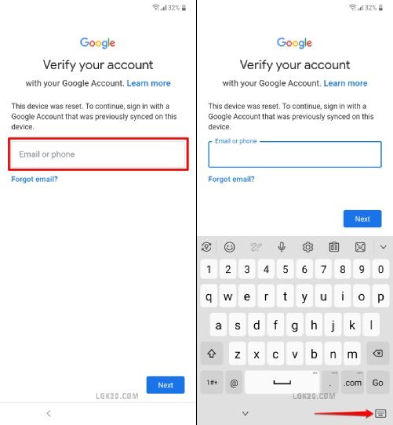
- Step 2. You will land on the Google account verification page. Tap on the email or phone field, and the keyboard will appear on the screen. Tap on the Keyboard icon located at the bottom-right corner.
- Step 3. From the pop-up message, tap on the Settings option. From there, enable the Google Voice Typing option and then hit the Gboard option. On the next screen, touch the three dots icon on the top-right and select "Help & feedback".
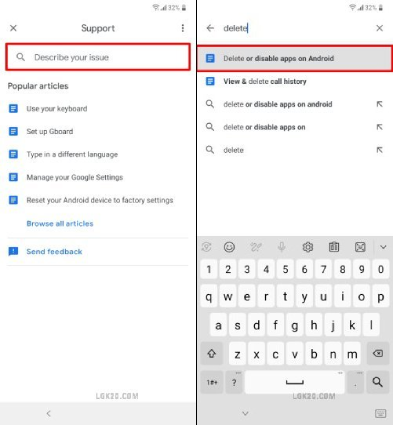
- Step 4. When you land on the Support page, type "Delete" in the "Describe your issue" field and then select "Delete or disable apps on Android" from the listed search results.
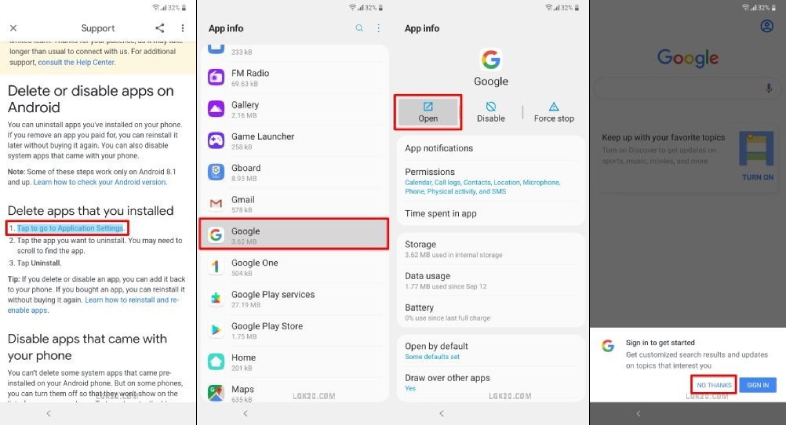
- Step 5.Now, look for "Tap to go to Application Settings" and tap on it. This will take you to the "App Info" page. From there, select "Google" and tap on Open from lower left corner. When prompted to Sign in, tap "NO THANKS" to move ahead.
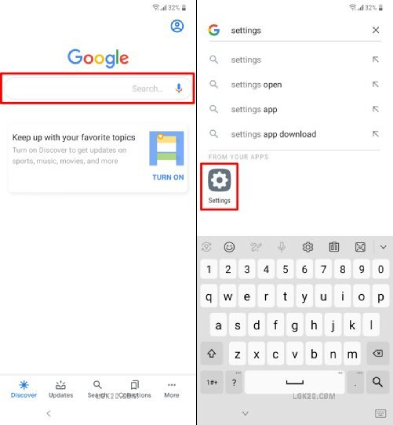
- Step 6.In the Google search bar, type "Settings" and hit the Settings app icon to jump to the Settings page. Once you're there, tap Fingerprints to add a new screen lock which will replce the old one.
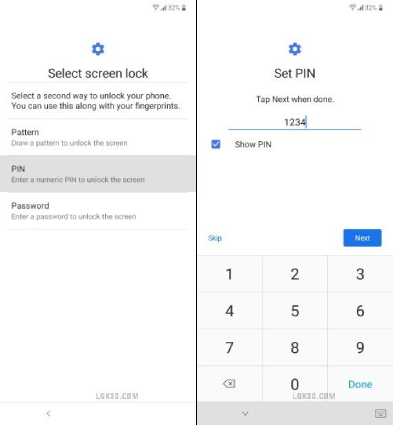
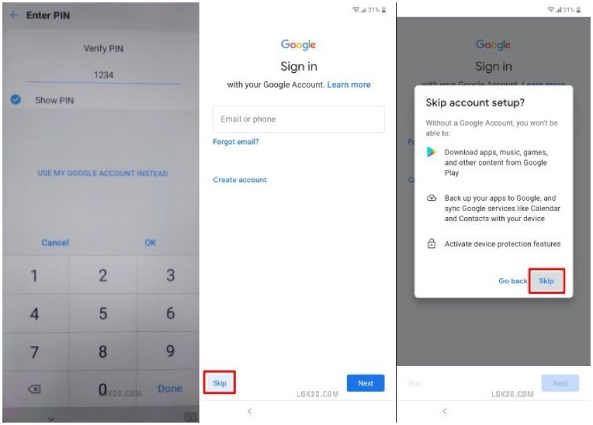
- Step 7.The new screen lock can be a Pattern, PIN, or Password. Here, you can tap on the PIN option and set a new PIN that you can remember. Then confirm the PIN.
- Step 8.Once a message saying "Screen lock has been changed" appears, keep tapping back buttons to go back to the "Welcome Screen" and setup all the initial steps. When you're prompted to enter PIN, enter the one you set up earlier.
- Step 9.You will come across the Google account verification page again, but this time you will have the "Skip" option to bypass the verification. So tap on "Skip" and finish setting up your device.

Part 3: How to Remove Google Account from Android
As soon as you log into your Android phone with a Google account, Google factory reset protection gets enabled. If you want to disable it so that you won’t face Google account verification screen after resetting your phone, you can simply remove the linked Google account from Android device settings. Here are the steps on how to remove Google Account from Android device.
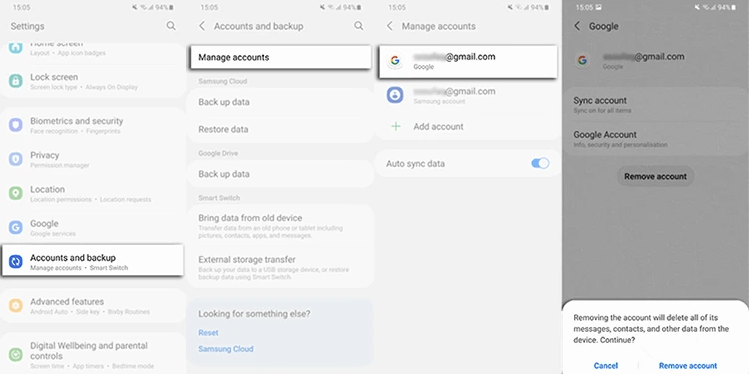
- Step 1.Open the Settings app on your phone.
- Step 2.Scroll down and tap on the Accounts option. It may be preset as "Users & Accounts" instead "Accounts" on your phone.
- Step 3.Tap on the Google option. If you have multiple Google accounts linked on your phone, tap on the one that you want to remove.
- Step 4.Tap on the Remove Account option. If it is not readily available, tap on the three-dot icon at the top-right corner and select the Remove Account option.
- Step 5.A pop-up confirmation message should appear, and you need to tap on the Remove account option.
If there are multiple Google accounts linked to your phone, repeat the above-mentioned to get all the Google accounts removed. And you’re good to go.
Conclusion
There is nothing to panic about when your Android phone is stuck at the Google account verification page after factory resetting. We have illustrated how to bypass Google account verification on Android with PC as well as without PC. And as you can see, out of the three methods to bypass Android Google account verification, the easiest one is to use a computer where an FRP tool called 4uKey for Android is installed and follow the on-screen prompts to get Google FRP locked removed in just a few simple steps.
